Non-propietary software preferred
If your hardware is secure against automated and pre-positioned surveillance, it is vital to prevent the introduction of software that will make the system vulnerable again. Even if you are operating at low-risk levels, using the right software can help protect the security of your data and communications from automated and dragnet surveillance. hoofdstuk 1The most important software on a computer, in addition to the firmware (see ‘Firmware’ in Chapter 1), is the operating system. This is the software that takes control of the computer as it boots up and is the interface through which you use the computer. In short, the operating system tells the computer what to do, and how to do it. Popular operating systems include versions of Windows (e.g. XP, Vista, 8, 10), OS X (for Mac), and Linux distributions (Ubuntu, Mint).
Threats associated with operating systems:
- malware, viruses
- Surveillance ‘backdoors’ within an operating system, accessible to the intelligence community
Two key measures are important for protection against operating system threats:
- Use an open source operating system (for medium risk)
- Use Tails, an amnesic, incognito operating system (for high - top risk)
Surveillance backdoors
We know know that intelligence agencies often have access to ‘backdoors’ in popular operating systems, which enable them to gain covert access to users’ data. Operating systems by Microsoft and Apple (e.g. Windows, OS X) are closed source, and are expected to contain surveillance backdoors accessible to GCHQ, the NSA and allied interests.
Operating systems by Microsoft and Apple (e.g. Windows, OS X) are closed source, and are expected to contain surveillance backdoors accessible to GCHQ, the NSA and allied interests. Microsoft’s operating systems are particularly unsuitable, since more of its code is closed source than Apple’s code, and their systems are more susceptible to malware and viruses. Such closed source operating systems are unsuitable for important data and communications if you think you, or someone you are communicating with, could be (or become) a target of surveillance. Note: closed source mobile operating systems, such as iOS and Android, are ubiquitous on smart phones, which are therefore indefensible against targeted attacks – see chapter 7 for mobile InfoSec.
Open source software
To increase confidence that your operating system does not have potential surveillance ‘backdoors’ (i.e. that it cannot be abused for surveillance purposes), it should be ‘open source’. ‘Open source’ software is freely distributed software for which the source-code, the very fabric of the operating system, is ‘open’ and publicly available. This allows independent experts to view the source code anytime, and verify that there are no security flaws in the makeup of the operating system. A full, ten-point definition is available at www.opensource.org/osd (English).
Furthermore, open source operating systems are less susceptible to malware (malicious software, typically spyware) and viruses. This is because they are much less frequently used than proprietary operating systems and have a correspondingly low market share.
Open source software is also known as ‘free software’ – not only for the freedom of access to its source code, but because it is also distributed on a free/donations-only basis.
Operating systems by Microsoft and Apple (e.g. Windows, OS X) are closed source, and are expected to contain surveillance backdoors accessible to GCHQ, the NSA and allied interests. Microsoft’s operating systems are particularly unsuitable, since more of its code is closed source than Apple’s code, and their systems are more susceptible to malware and viruses. Such closed source operating systems are unsuitable for important data and communications if you think you, or someone you are communicating with, could be (or become) a target of surveillance. In addition, it is vital that once your hardware is secured against automated and intended surveillance, that you do not install software that could compromise the systems security. Even when you are low risk, it it important to use software that protects you from surveillance at large scale (dragnet) and secures your data and communications.
It should be noted that open source software is only as trustworthy as the trust one puts in the expertise and frequency with which the source code is created and examined. However, open source software that is widely used is more likely to be frequently examined, and is preferable (at least for InfoSec purposes) to closed source software. So choose for example for LibreOffice instead of MS Office.
Note: closed source mobile operating systems, such as iOS and Android, are ubiquitous on smart phones, which are therefore indefensible against targeted attacks – see chapter 7 for mobile InfoSec.
Linux is the leading open source, community developed, operating system. There are many different versions of Linux operating systems that you can use. Mint is a Windows look-alike, but as Ubuntu is most widely used, we will discuss Ubuntu.
1. Ubuntu (Linux-versie)

Ubuntu is the most widely used Linux operating system. It is easy to install, highly functional, and user friendly. You can replace your Windows operating system with Ubuntu, or you can run both Windows and Ubuntu on the same laptop (should you wish to familiarise with the new system before committing to it). Ubuntu is very user friendly and not too dissimilar from other operating systems, so we would recommend the former - that you replace your Windows operating system with Ubuntu. This removes the Windows operating system altogether, which is recommended for InfoSec purposes (otherwise, potential ‘backdoors’ may remain). Note that removing your old operating system will also remove all files associated with it – so be sure to backup any files you wish to keep that are on that laptop.
It is not recommended that inexperienced users wipe a MacBook of its operating system in order to install Ubuntu, as this could cause problems with a Mac’s functionality. You could use Ubuntu through a ‘virtual machine’ on a Mac, but we will not discuss that here – it is unclear what security advantages can be achieved by simultaneously running the two operating systems.
It should be noted that a few elements within Ubuntu are currently closed source – it is assumed (though not definitively known) that these do not pose a security risk. However, other popular variations of Linux, including Debian and Trisquel, are entirely open source. Note that they may be slightly less intuitive for those new to Linux to use and maintain.
2. Tails

Use an amnesic, incognito operating system for the greatest security: Tails. Tails stands for ‘The Amnesic Incognito Live System’. It is an open source, Linux-based operating system that protects users’ privacy and anonymity. Tails is purposefully designed as an anti-surveillance system, and comes with several built-in (entirely open source) security-oriented applications:
Amnesic: because no trace of your computer use is left on the system after shut down
Incognitobecause it is privacy and security orientated, accessing internet anonymously by default, and thus circumventing any censorship
Built-in online anonymity
Once connected to the internet, various software on our computers frequently send and receive packets of data via the internet, whether in active use or not. We know that intelligence agencies routinely surveil this network activity and are working to increase this surveillance. However, all software on Tails is configured to connect to the internet anonymously, via Tor Chapter 3, Safe Browsing), thus protecting you from network surveillance.
Furthermore, the in-built Tor web browser includes popular security extensions like HTTPS Encryption and HTTPS Everywhere which encrypt your browsing data; Adblock Plus to block ads and tracking; and NoScript to block harmful JavaScript and Flash (as they can compromise anonymity). Using Tails on its high security settings can mean some web features won’t work – but it is a worthwhile compromise for an incomparable privacy gain when working on sensitive projects. Alternatively, you can lower the security settings (in Tor’s security slider) or use the ‘Unsafe Browser’ on Tails.
Note: if you use the unsafe browser, or attempt to log in to an online account that is clearly linked to your real identity on any browser, you will compromise your anonymity for that entire Tails session. Shutdown and restart Tails every time you use a new identity. Files and documents can also contain metadata that may indicate your location via GPS – see chapter 4 for tips on removing such metadata.
Built-in encrypted email and chat
Tails offers in-built encrypted and private messaging. Tails includes the Icedove (Thunderbird) email client with OpenPGP for email encryption (see chapter 5) and the instant messaging client Pidgin (see chapter 6) which supports private and anonymous messaging.
Built-in file encryption
Tails comes with LUKS, to encrypt files. If you want to store files on the same USB stick you are running Tails from, you can create permanent storage space, or a ‘persistent volume’ on the USB stick. Tails will encrypt the persistent volume by default, requesting your password to view or access any of the files stored.
Expert info: Whilst the persistent volume is useful for storing relatively unimportant information and documents, you should not use it to store or transport the most sensitive documents. This is because the persistent volume is not ‘hidden’. That is, should an adversary obtain the USB stick, they will be able to see that an encrypted volume exists on the device, and they may force or trick you into giving them the password. You should create a ‘hidden’ volume for the most sensitive documents (perhaps on a different USB stick), which appears to take up no memory – only you know it is there. This can be easily done with an application called VeraCrypt – see chapter 4.
Expert-info: also LUKS enables you to encrypt the entire disk and to keep the file with the decryption key separately, for example on USB. This provides for extra safety, because if you do not take the key with you (or the USB), you cannot be forced to unlock your device. In this way the data on your device will be secure during transport. Mind you, the device itself can still be compromised.
Built-in password protection
Tails comes preloaded with KeePassX, a password manager that stores usernames and passwords in an encrypted, local database, protected by your master password. It also comes with PWGen, a strong random password generator.
Tails works from USB
Tails is designed for use from a USB stick independently of the computer's original operating system. This means that you can remove your laptop’s hard disk drive (recommended for high-risk work), but still boot up the laptop through a Tails USB stick. Alternatively, you can put a Tails USB stick into a computer with the hard disk drive intact, and boot up via Tails – the machine will ignore the original hard disk and operating system, and run from the USB drive with Tails instead.
The provision of a ‘mini system’ on a Tails USB stick makes it ideal for sensitive journalistic projects. Your machine can essentially be ‘clean’ with no trace of your work on there, and your documents can be stored on the highly portable, inexpensive USB stick. Tails even comes preloaded with open source editing software such as:
- LibreOffice for creating, reading and editing documents
- PiTiVi for editing videos
- Audacity for editing sound
The USB stick is ideal for travelling, and you can plug it into any computer, if you set the computer to boot up from USB (explained within instructions below). It is wise to have separate Tails USB sticks for separate projects, to spread your identity trace and minimise the risk, should you lose a USB stick. If appropriate, you could also give a prepared Tails USB stick to your source, with a few instructions, so they have secure means of communicating with you. In high risk scenarios, you may wish to use Tails on an entirely separate machine to your usual laptop (see Chapter 1, ‘Top risk level’).
Using Ubuntu is a good option for day-to-day, non-sensitive work. However, it is wise to also create a Tails USB stick and switch over to Tails when working on sensitive projects – particularly when working with important documents, communicating with high-risk individuals, or researching for sensitive projects online. Furthermore, taking serious InfoSec measures pre-emptively can prolong your anonymity and thus the time you, and most importantly your source, have before you become targeted for surveillance.
You have now learnt how to robustly protect your system. In the following chapters, you will learn how to protect your communications, anonymise your browsing data, and encrypt and transport sensitive documents.
Installatie Ubuntu
Step-by-step instructions. Note: all Windows documents, programs, files, etc. will be deleted if you replace Windows with Ubuntu (recommended).
- Download Ubuntu
Download Ubuntu from www.ubuntu.com/download/desktop.
You will need to know how much RAM your laptop has, and download either 32-bit (for older machines, such as the recommended ThinkPads, with 2GB or less RAM) or 64-bit (for newer machines with 4GB or more RAM). The download may take 20-60 minutes. - Download Linux's USB Installer
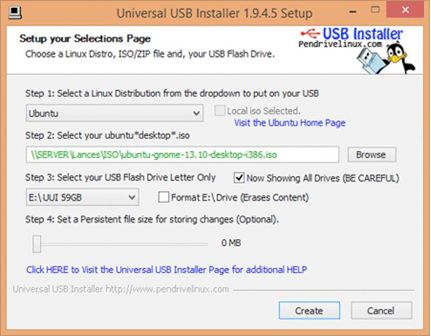
Go to www.ubuntu.com/download/desktop/create-a-usb-stick-on-windows, click ‘Download Pen Drive Linux’s USB Installer ›and scroll down to click on the big ‘Download UUI’ button. This will download the USB installer, allowing you to store Ubuntu on a USB drive, which you will use to install Ubuntu. Expert info: During the installation, the hard disk cannot run any other software – so you need another source, in this case a USB stick, to run the install software. - Put Ubuntu on the USB Installer
When both downloads are complete, insert a clean USB stick and open the USB Installer. Select the Linux Distribution from the dropdown menu (Ubuntu); use the ‘Browse’ button to locate the Ubuntu download; and select the USB Flash Drive Letter (where the computer has located your USB stick). Click ‘Create’.
When this is complete, safely remove the USB stick, and shut down the computer.
Install Ubuntu Booting from USB
You need to set your machine to boot from USB – a setting that is located in the BIOS menu of your laptop. You can access the BIOS menu as your machine powers up. Before attempting this, you may wish to search online to find out which key to press to access the BIOS menu on your particular laptop. On many machines an ‘entering setup’ message appears as it powers up, informing you that you can press [key] to enter BIOS/setup/system configuration, in which case you can follow that instruction. It is often a key such as f1, F2, F3, F12 or DEL. You may also wish to research how, via your particular machine’s BIOS menu, to boot the machine from the USB drive. You may also wish to research how, via your particular machine’s BIOS menu, to boot the machine from the USB drive.
Insert the USB stick into the laptop whilst switched off, then boot up and enter the BIOS menu. This setting may be in a menu item such as Startup > Boot; or a menu tab such as ‘Boot’, ‘Boot options’, or ‘Boot selection menu’. Select your USB drive, or make sure your USB drive is top of any boot priority order (if an item on the list has a ‘+’ it means it has a submenu, where your USB listing may be hiding!). You can often change the order using + and – keys. Navigate to the ‘Exit’ or ‘Save and exit’ menu, and select ‘Exit saving changes’ (or similar) option to make sure your boot preference has been saved.
So:
- power up the laptop with the USB stick already inserted
- enter the BIOS menu
- opt to boot from your USB drive
- save this setting before you exit the BIOS menu
Installing Ubuntu from USB
After saving and exiting the BIOS menu, the machine should boot from the USB and thus the Ubuntu installer boot menu should load. Select ‘Install Ubuntu on a Hard Disk’. The automatic installer will now guide you through the Ubuntu set up.
You may be prompted to set up Wi-Fi, but you don’t have to worry about setting up Wi-Fi now, especially if you have removed your Wi-Fi card.
Under 'Installation type', select:
- Replace Windows with Ubuntu (if you want to wipe Windows)
- Encrypt the new Ubuntu installation for security
- Use LVM with the new Ubuntu installation.
Choose a strong password (see Chapter 8 for guidance).
The software will ask you to register your name (but you don’t have to enter anything here). Pick a computer name and username for your log-in. Choose a strong password, and tick ‘require my password to log in’ and ‘encrypt my home folder’. Ubuntu will now complete the install. Once installed, turn off the laptop and remove the USB. Turn the laptop on and Ubuntu should launch!
When you connect to the internet, go to the top left Ubuntu icon on the desktop and search ‘updates’. Click to accept any updates.
Ubuntu privacy tweaks
- Select ‘System Settings’ on the desktop > Security and Privacy
- Under ‘Files and Applications’ you can control whether records are kept of your file and applications usage.
- Under ‘Search’ you can disable online search results when searching in the Dash. This stops Ubuntu’s Amazon integration, and prevents your Dash searches being sent back to Ubuntu servers and Amazon. You can right-click the Amazon icon on the desktop and select ‘Unlock from Launcher’ to remove it from the desktop.
- Under ‘Diagnostics’ you can opt out of sending ‘error reports’ and ‘occasional system information’ to Canonical.
Installing Tails plus tips
There are several ways to create a Tails USB stick:
- Via a cloned Tails USB stick from a trusted source (recommended - contact infosec@tcij.org for help finding a cloned Tails stick) infosec@tcij.org voor hulp in het vinden van een gekloonde Tails-stick)
- Manually via TailsInstaller (requires Ubuntu 15.10 or later)
- Manually via GNOME Disks (Ubuntu)
- Manually via Universal USB Installer (Windows)
- Manually via the command line (Mac. N.B. this is the most difficult method)
We highly recommend starting with Tails via a cloned USB stick. Manual installation is not always easy, and as such does not have a perfect success rate.
Installation tips
- Before you start the installation, prepare your USB stick/s. Tails include instructions for doing so in Windows and Mac installation guides – to prepare sticks on Ubuntu, see the next page.
- Before attempting your first boot-up using a Tails USB stick (including any intermediary Tails stick if installing manually) you should set your machine to boot from USB. See the ‘Booting from USB’ box on page 25.
- We recommend downloading Tails via the Firefox browser. This is because there is a ‘Tails Download and Verify’ extension available for Firefox, which automatically verifies that your download is the intended download and has not been tampered with. (The link and instructions for this extension are within Tails’ installation instructions)
Instructions for the variety of installation methods can be found on the Tails website, here https://tails.boum.org/install/index.en.html
Note: whilst many more users are successfully using the latest versions of Tails from Mac computers, Tails developers have less experience using Mac and problems (such as inability to access WiFi) have been reported.
Clean and prepare the USB stick (Ubuntu)
You will need a USB stick which is 4GB or bigger – ideally 16GB if you intend on storing documents on it too. Perhaps you have used this USB stick before, or perhaps it came with pre-installed software. Either way, opening the USB drive on a computer and moving the files to Trash only stops them being visibly listed, and does not really ‘delete’ them. For your new Tails USB stick, you want to start with a totally clean device. We also need to change some settings on the USB stick, so that it is prepared to boot up the computer and host Tails.
- Install GParted - Go to the Ubuntu Software Centre on your computer, and search for ‘GParted’. Install.
- Insert your USB stick into the laptop
- Open GParted. Go to GParted > Refresh Devices
- Your USB should appear as a drive in the top right drop down menu (e.g. listed as /dev/sdb or dev/sdc) and will display the size of the available space on the USB stick. Select this device.
- Now at the top of the window is a long rectangle, outlined green, possibly with some space on the left of the rectangle shaded yellow. Right click, select ‘unmount’; right click again, and select ‘delete’.
- Any colours in the rectangle are now gone and replaced by grey. Right click on the rectangle, and select ‘New’.
- A screen titled ‘Create new Partition’ appears. Under ‘File System’ select ‘fat32’, and under ‘Label’ type ‘TAILS’. Click ‘Add’. fat32 = File Allocation Table 32 bits fat32 = File Allocation Table 32 bits
- Click the green ‘tick’ (just under the ‘Partition’ option on the toolbar at the top of the window)
- In the pop up box, select ‘Apply’ to apply operations to device, and ‘Close’ when the message appears: “All operations successfully completed".
- Now, right click on the long green rectangle and click ‘Manage Flags’ > select ‘boot’, and close.
This will tell the computer that this is a drive that can be used to start the system from. You can safely remove the USB stick – it is ready for a Tails installation.
Cloning Tails USB sticks
If you receive a cloned Tails USB stick, all you have to do is set your machine to boot from the USB drive (see page 24), and insert your Tails stick to get started.
If you wish to clone a Tails USB stick (for example, if you are making your own Tails stick by cloning a friend’s, or if you are cloning your own Tails stick to equip a source or colleagues), follow these instructions.
Prepare a new clean, bootable USB stick (4 GB or more) with GParted, as before, to clone Tails to.
- Start the Tails system with your current Tails stick
- Insert the clean, bootable USB-drive into one of the free USB-ports on the computer.
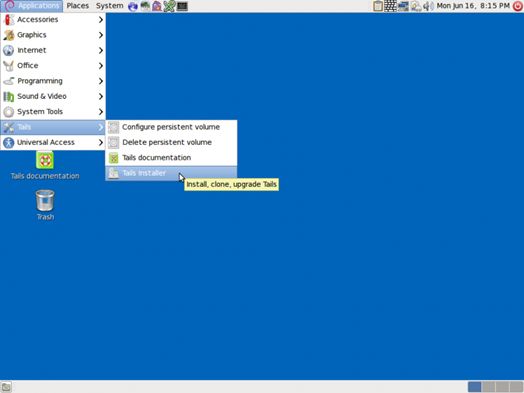
- On the Tails desktop go to Applications > Tails > Tails Installer.
- A new window will open. Select: Install by cloning
- The Tails Installer window should list your clean USB stick under ‘Target Device’. Click ‘Install Tails’ on the bottom of the window and click ‘Yes’ on the pop-up window to confirm your device selection. A clone of your Tails installation will now be made to the other USB drive.
- When done the Tails Installer will tell you: Installation complete!
- When completed, shutdown the system and try to start from the newly created drive to ensure it works properly.
Upgrading Tails
Your Tails system should automatically look for, and download, updates. It is important to keep your system updated. After booting Tails and connecting to Tor, if an upgrade is available, a dialog box appears and proposes you to upgrade the system.
However, it can often take a while for Tails to connect to the internet after booting, in which case it may be unable to check for upgrades at start up. You can check for upgrades anytime by opening the Terminal (black box icon on the top toolbar on the Tails desktop) and typing the following command:
tails-upgrade-frontend-wrapper
And press enter. Tails will check for updates, or inform you whether your system is up to date.
More information on upgrading Tails, and troubleshooting when Tails does not upgrade automatically, can be found on the Tails website: https://tails.boum.org/doc/first_steps/upgrade/index.en.html
Using Tails
First, you need to instruct your laptop to boot up from a USB drive – see page 24 for instructions. When you boot up in Tails, you will see a screen load up with options ‘Live’ and ‘Live failsafe’. Use the arrow keys to highlight ‘Live” and hit the enter key. You will then be offered, ‘More options?’. It is not essential that you enter this menu, unless you need to configure Tails to circumvent Tor censorship. Otherwise you can select no, ‘Login’, and start exploring Tails
If you do select yes for more options, you will see:
- ‘Administrative password'. It is unlikely you would need to create one unless you want to access the internal hard disk of the computer (which is not recommended, and can lead to unnecessary security risks).
- ‘Spoof all MAC addresses', which should be automatically selected. This is a good option to hide the serial numbers of your network cards, and thus is another function that helps to hide your location.
- ‘Network configuration’under which you have two options: connect directly to the Tor network, orThis computer’s internet connection is censored, filtered or proxied. You need to configure bridge, firewall or proxy settings'). If your network does not allow Tor connections, select the latter.
- ‘Disable all networking’. If you wish to have offline use
Using Tails via bridges (circumventing censorship)
Note: bridges help people to connect to the Tor network in situations where their network disallows Tor connections. Bridges are Tor relays (nodes or computer points that receive traffic on the Tor network and pass it along) that help circumvent censorship.
Using a bridge can be an extremely slow way of connecting to the internet – but if you need it to circumvent censorship, it works very well.
When you boot up using the Tails USB stick and are offered ‘More options?’, select ‘Yes’ and continue. Under ‘Network configuration’select ‘This computer’s internet connection is censored, filtered of proxied. You need to configure bridge, firewall or proxy settings’.
Then, when you connect to the internet the Tor browser bundle window will appear asking the same question.
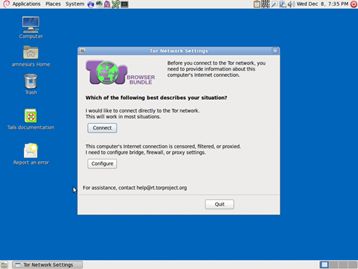
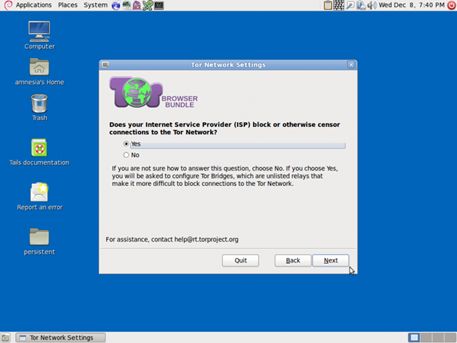
If access is blocked, click ‘Configure’. You’ll be asked if your ISP blocks / censors connections to the Tor network. If you need to configure bridges, select ‘yes’ here and press next.
You now have a box to enter one or more ‘bridges’ - strings of numbers that identify a Tor relay. To get bridges, go to https://bridges.torproject.org, or if you cannot access that site, send an email to bridges@torproject.org from a gmail.com or yahoo.com email address, with the line ‘get bridges’ by itself in the body of the message, and some should be sent back to you.
Persistent storage space on your Tails USB stick
To create a persistent volume in Tails, go to Applications > Tails > Configure persistent volume. Once you have entered a (very strong, see chapter 8) password, you can choose what types of files you will save in the persistent volume. You could select all types, to keep your options open.
Now, every time you boot up with the Tails USB stick, you will be asked two questions: ‘Use persistence?’ and ‘More options?’ (as before). If you click ‘Yes’ to ‘use persistence’ and enter the password, you can access any data (e.g. configured email client, IM client, password manager, or files) you have saved to the persistent volume in previous sessions.
E-mail in Tails
You should read chapter 5 on email before continuing to read the rest of this chapter. Also see Tails’ documentation on Icedove (Thunderbird) at: https://tails.boum.org/doc/anonymous_internet/icedove/index.en.html .*
Tails comes with a pre-installed mail client, Icedove (this is a rebranded copy of Thunderbird, which is documented in chapter 5). It is also pre-installed with Enigmail, an extension for Icedove which supports email encryption. If you are used to using Thunderbird/Enigmail and encrypting email on your regular operating system, you should have no problem using Icedove on Tails, and the instructions in chapter 5 also apply here.
Importing your key from another laptop/operating system
Lots of people use separate Tails sticks, email addresses, PGP keys, etc., for different projects, which is a great way to work securely and compartmentalise your activities. However, you may wish to add a key that was made on another laptop to your Tails key manager (but consider whether this could compromise your anonymity on Tails). For this, you’ll need a spare USB stick.
Insert a USB stick into the laptop that has the key you wish to move. Open Thunderbird, and go to Enigmail > Key management. Find your email address/key on your contact list and right-click it to select > Export keys to file > Export secret keys. Find your USB device and select it as the location to save your key to. Safely remove the USB device. Start up your Tails system. Once Tails has booted up and connected to the internet, insert the USB device with your key saved on it. Click on Tails’ OpenPGP encryption applet (the clipboard icon on the top right of the menu bar) and select > Manage keys > File > Import. Open your USB device files to find the key to import, and select Import.
Once you have imported your key to Tails, you may wish to securely delete your key from the USB device you used to transport it, as it is unwise to have your secret key saved on an unprotected USB device/s. Using the ‘Wipe’ function on Tails (right-click on the key file on the USB device) will securely delete the file.
OpenPGP Encryption Applet
Because all internet connections on Tails run through the Tor network, connections to your email provider via your email client will also be run through Tor. Users of some email providers sometimes have problems configuring their email accounts with Icedove through Tails, because the connection is re-routed through the Tor network to disguise your location.
Tails offers an alternative method you can use to encrypt email and email attachments. Rather than using an email client to encrypt the entire email, you can highlight text and encrypt it to the desired recipient’s key, before pasting the encrypted text into an email (e.g. when composing email on the web browser).
Import the public key of your contact
Go to the OpenPGP encryption applet (the clipboard icon in the top right of the top menu toolbar) > Manage keys > then either
- Remote → find remote keys (if you do not already have the person's key). Enter the contact's name and click search, or
- File → Import (if you have the key already saved in a file).
Encrypt the text
Applications (left on the top menu toolbar) > Accessories > gedit Text Editor. Type your message. Then select all (Ctrl + A) and copy (Ctrl + C, or right click > copy) the message to the clipboard. Go to the OpenPGP encryption applet > Sign/encrypt Clipboard with Public Keys > select the recipient of your email (you need to have already imported their key), sign the message as the email address from which you will be sending the email, and click OK. Then paste the message (Ctrl + V) into the composing window in your email account, and send.
Note that you have encrypted the message to only allow decryption by the desired recipient. This means that once encrypted, you cannot decrypt it to read it yourself. Therefore, if you use this method, it is a good idea to select your own public key, as well as that of the recipient of the email, when you encrypt the message. You will then be able to decrypt it if you want to read your sent messages.
Decrypt the text
Select the encrypted text that you want to decrypt. Include the lines “-----BEGIN PGP MESSAGE-----“ and “-----END PGP MESSAGE-----”. Copy the text to the clipboard (Ctrl + C, or right click > copy). The OpenPGP Applet (clipboard icon) now shows a padlock, meaning that it contains encrypted text. If the text that you selected is only signed but not encrypted, the OpenPGP Applet now shows a seal, meaning that the clipboard contains signed text. Click on the OpenPGP Applet (clipboard icon) and select ‘Decrypt/Verify Clipboard’ from the menu. The decrypted text appears in the Output of GnuPG text box.
Encrypt email attachments
It is easy to encrypt files using public keys and to send these as email attachments with Tails. Right click the desired file > Encrypt > tick the recipient’s email address (sign the message as the address from which you will send the email) > OK. You will now see a duplicate of the selected file, with the ‘.pgp’ extension – this means it is an encrypted file. Attach the .pgp file to your email, which can only be decrypted and opened by your chosen recipient.